How to Protect Outdoor Wood Features from Arizona Sun & Moisture
Protecting Outdoor Wooden Fences And Fixtures in Phoenix
Nothing beats Arizona’s outdoor living, but our intense sun and sprinkler moisture are brutal on wood. UV, heat, and constant splash back can fade color, crack grain, and invite rot in months, not years. Yes, you can protect your deck, fence, and benches with the right products and habits. Protecting your wood pays off. You’ll keep your spaces looking sharp, extend the life of every board, and cut repair costs over time.
- How to Protect Outdoor Wood Features from Arizona Sun & Moisture
- Protecting Outdoor Wooden Fences And Fixtures in Phoenix
- Why Arizona's Harsh Climate Hurts Outdoor Wood
- Choose the Best Woods and Prep Steps for Lasting Results
- Apply Proven Protections to Block Sun and Water
- Maintain Your Wood Features for Years of Enjoyment
- Frequently Asked Questions
- Protect Your Investment: Maintenance is Key
Unprotected wood dries out in peak heat, then swells when irrigation hits it. That cycle opens checks (cracks in the wood) and weakens fasteners, which speeds up decay and staining. Add dust and hard water, and finishes fail even faster.
What matters the most when it comes to proper protection? It starts by understanding the risks from UV, heat, and water, then using the best materials for Arizona yards, and the right sealers and stains for long-lasting color and defense. Sprinkler and shade tweaks also make a big difference. In this post, you’ll learn how to pick lumber and hardware that hold up, choose UV-blocking oil or stain, and set a maintenance schedule that sticks. We will cover cleaning, spot repairs, and when to recoat, so you avoid costly rebuilds.
Why Arizona’s Harsh Climate Hurts Outdoor Wood
Arizona sun and irrigation hit wood from opposite sides. UV strips color and weakens fibers. Water from sprinklers soaks boards and posts, then heat bakes them dry. That cycle repeats most days, which is why damage shows up fast here. With 300+ sunny days a year and a UV index that jumps to very high or extreme in summer (often 10 or higher, especially from 10 a.m. to 2 p.m.), finishes do not last like they do in milder climates. If your deck or fence looks tired after one Phoenix summer, this is why.
Effects of Intense UV Rays on Wood
Arizona’s sun punishes wood finishes and the wood itself. UV breaks down lignin, the natural glue that holds wood fibers together. It also degrades the natural oils that give wood its rich color and flexibility. Once those oils go, the wood dries out, the surface turns brittle, and the fibers start to lift.
What that looks like in practice:
- Fast color loss: Vibrant tones fade to a flat gray in a few months, not years, especially on south and west faces.
- Surface checking: Heat drives moisture out, the surface shrinks, and hairline cracks form. Those cracks widen as days swing from hot to hotter, then cool at night.
- Splintering and raised grain: Broken fibers lift underfoot and along handrails. Sanding feels like it never ends because new fibers keep lifting after sun exposure.
- Finish burnout: Clear sealers without UV blockers can go chalky or patchy after one summer in Phoenix. Film finishes can blister or peel when the sun outpaces their flexibility.
Early warning signs to catch:
- Uniform graying on top rails, steps, and fence caps.
- Tiny end-grain cracks at board ends where moisture escapes fastest.
- Dry, rough feel, even after cleaning.
- Micro splinters that snag a towel or clothing.
Local conditions speed this up. Southern Arizona sees extreme UV in late spring and summer, with June among the worst months. When UV is that high, a fresh finish can lose protection weeks after application if it lacks strong UV absorbers or pigments. Add heat expansion by day and contraction at night, and even stable woods start to check. This is why standard clear water sealers fail here. They do not block enough UV, and thin coats cannot keep up with the sun’s daily assault.
Tip for triage: Compare shaded wood to fully exposed boards. If shaded areas still have color and smoother grain while exposed sections look gray and dry, UV is the main culprit.
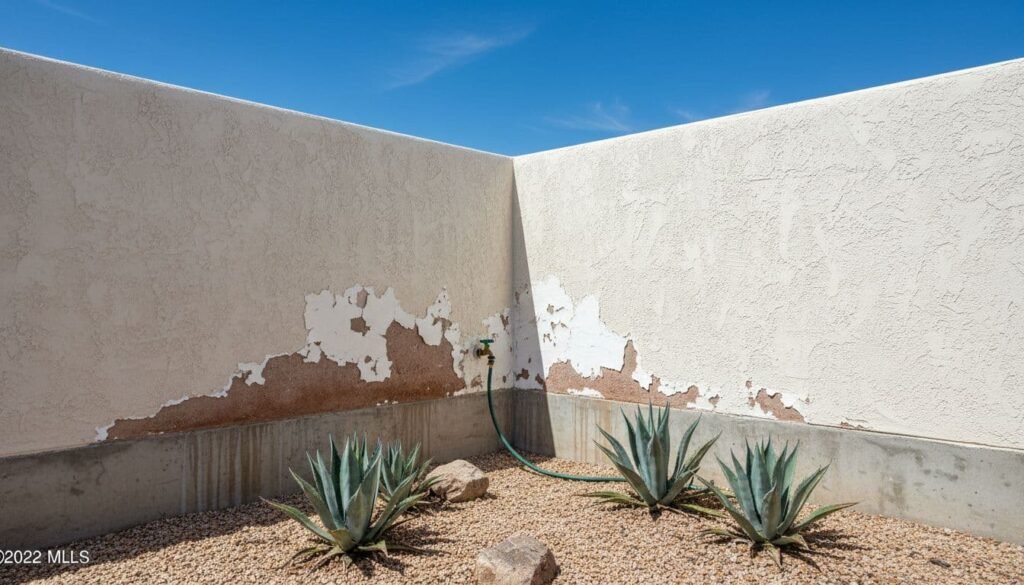
How Irrigation Water Causes Rot and Swelling
Irrigation is the other half of the problem. Overspray and splash back soak lower rails, fence pickets, bench legs, and post bases. Then the sun dries them fast. That wet-to-dry cycle stresses fibers, opens checks (cracks in the surface), and draws more water into the wood next time it gets soaked.
Common moisture effects you will see:
- Swelling and warping: Boards cup or twist as one side stays damp and the other side bakes.
- Mold and algae: Shady, wet spots grow black, green, or white film. That film traps moisture and speeds decay.
- Soft spots and rot: Water trapped at joints, end grain, or buried post bases turns wood punky. A screwdriver can press in with little force.
- Insect activity: Damp wood invites termites and carpenter ants, especially near soil contact or planter boxes.
The cycle is the real stress. Sprinklers hit wood in the early morning or evening. The surface swells. The sun dries it by midday. Fibers shrink and crack. Those cracks pull more water into the wood on the next cycle. Poor drainage around posts or at the bottom of fences makes it worse. Mineral salts from hard water build up on the surface, which can break down finishes and hold moisture against the wood.
Early water damage signs to watch for:
- Dark halos around fasteners or at the end grain.
- Musty odor after watering or after a rain.
- Raised fibers that feel fuzzy after drying.
- Softness at the base of posts, stair stringers, or fence pickets.
- Green or black blotches that return days after cleaning.
Simple checks help you spot trouble early:
- Press a screwdriver tip into base areas and joints. If it sinks in easily, you have decay starting.
- Look for uneven boards. Cupping or twisting near sprinkler arc points to repeat wetting.
- Watch irrigation patterns. Overspray on fence lines and deck edges is a red flag.
- After watering, note dry times. Areas that stay damp for more than a few hours need airflow or drainage fixes.
Standard protections often fail in this setting because they treat one threat at a time. A clear water sealer sheds droplets but lacks UV blockers, so the sun cooks it off. A thick film finish can crack when soaked, then peeled by heat. Thin single coats do not last through months of high UV and frequent sprinkler hits. In Arizona, both UV and water are constant, so wood needs protection that handles sunlight, frequent wetting, and constant thermal movement.
Bottom line: Arizona’s sun strips protection and dries wood, while irrigation keeps feeding moisture into every crack the sun creates. Recognize the early signs, and you can plan the right products and maintenance before damage gets expensive.
Choose the Best Woods and Prep Steps for Lasting Results
Picking the right species and prepping it well is half the battle in Arizona. Woods with natural oils and extractives shrug off sun and irrigation better, which means fewer repairs and longer finish life. Good prep locks in that advantage.
Top Wood Types That Stand Up to Desert Conditions
Natural durability matters in relentless UV and repeated wet-to-dry cycles. These species earn their keep in Arizona yards.
- Cedar: Western red cedar has natural rot and bug resistance, plus stable grain that moves less in dry heat. It will gray without a UV finish, but it does not split as fast as soft budget woods. Great for fences, pergolas, and benches.
- Redwood: Rich in tannins, redwood resists decay and holds shape in heat. It accepts stains well, and with a pigmented finish, it keeps color longer under intense sunlight. Ideal for visible elements where you want a refined look.
- Teak: Loaded with natural oils, teak resists rot, moisture, and sun. It stays dimensionally stable, even with irrigation splash. Often used for marine work, which tells you how tough it is. For furniture or premium decking, it is the most durable pick.
Why these beat untreated pine or oak in Arizona:
- Higher natural oils protect fibers from moisture and UV breakdown.
- Better stability reduces checking and warping with daily temperature swings.
- Slower decay around end grain and joints where sprinklers hit hardest.
Cost and availability snapshot:
| Wood | Strengths for AZ | Cost tier | Availability in AZ |
|---|---|---|---|
| Cedar | Rot resistance, stable, light | $$ | Common at lumberyards and box stores |
| Redwood | UV friendly with stain, durable | $$–$$$ | Stocked less widely, easy to special order |
| Teak | Top-tier rot and UV resistance | $$$$ | Available via specialty suppliers and importers |
| Untreated Pine | Low cost, but weak to UV and water | $ | Widely available, not advised without treatment |
| Oak | Hard, but many oaks decay outdoors | $$ | Less common for exterior use locally |
Skip untreated pine and most oak outdoors here. They dry out fast, check early, and soak up irrigation at the end grain. If you must use pine, choose pressure-treated for structural parts and still plan on strong UV protection.
Essential Prep Work Before Adding Protection
Smart prep helps any wood last longer in the sun and sprinklers. Follow a simple, repeatable process.
- Clean: Wash with mild soap and water to remove dust and mineral deposits. Use a soft brush or a wide nylon scrub brush. If you use a power washer, keep pressure low, around 500 to 800 PSI, and hold the wand 12 to 18 inches away to avoid fuzzing the grain.
- Sand to remove mill glaze: New boards often have a shiny surface that blocks stain. Sand all faces with 80 to 120 grit, then finish exposed faces at 120 to 150 for a smooth feel. Vacuum and wipe with a damp cloth to lift dust.
- Dry fully: Wood must be dry before finishing. Aim for a moisture content under 15 percent. In Arizona, one to three warm, dry days often occur after washing. Shade helps prevent flash drying that can raise grain.
- Repair early: Fill hairline checks and small cracks with a high-quality exterior wood filler or an epoxy kit. Seal exposed end grain with a penetrating sealer to slow water uptake.
- Prep for movement: During installation, leave small gaps between deck boards and slats for drainage and expansion. Pre-drill near the ends to reduce splits. Use stainless or coated fasteners to avoid rust stains.
Tools and supplies to have on hand:
- Soft brush, bucket, mild soap, garden hose.
- Random orbit sander, 80 to 150 grit discs, sanding block for edges.
- Low-pressure power washer option, used carefully.
- Exterior filler or epoxy, putty knife, rags.
- Moisture meter for spot checks.
- Quality natural-bristle or synthetic brush and a lint-free pad for even sealer or stain application.
Good wood plus good prep means your first coat bonds deeper, blocks UV better, and sheds irrigation without peeling. The payoff is fewer touch-ups and a finish that still looks sharp after peak summer.
Apply Proven Protections to Block Sun and Water
Arizona sun and irrigation punish wood from the surface in. Your finish must do two jobs at once: block UV to stop color loss and fiber breakdown, and repel water so repeated wet-to-dry cycles do not crack the grain. Use products that penetrate and move with the wood, apply them in the right conditions, and back them up with shade where it counts.
Sealers and Stains That Fight UV and Moisture
Penetrating finishes set the baseline for durability. They soak into the fibers, add UV blockers, and resist sprinkler splash without peeling.
- Oil-based vs water-based
- Oil-based: Deeper penetration, strong water resistance, better at handling irrigation and thermal movement. They can amber slightly, which many people like on cedar and redwood. Great for decks, fences, and benches that get overspray.
- Water-based: Fast drying, low odor, and easy cleanup. Choose pro-grade formulas with strong UV packages for full-sun exposure. They are a good pick when you want minimal color shift and a faster project.
- Reliable product picks for Arizona-like conditions
- Seal-Once NANO+POLY (water-based): Penetrates and adds a protective shell for solid water beading. Good for decks and fences in high UV.
- CWF-UV by Flood (oil-based): A classic penetrating UV oil that resists graying and sheds water. Works well on softwoods.
- Defy Extreme (water-based): Uses zinc nano-technology for UV and mildew resistance in heavy sun.
- Rubio Monocoat Oil (oil-based): Natural look with strong penetration and no peeling since it is not a surface film. Plan on maintenance on high-exposure faces.
- When to use varnish
- For small, high-exposure items like top rails or furniture arms, a marine varnish with strong UV inhibitors can add a glossy sacrificial layer. Epifanes is a respected option.
- Varnish needs multiple thin coats and periodic touch-ups. It is best in limited areas where you can recoat easily.
- Avoid standard polyurethanes outside
- Most clear polys get brittle, turn gummy in heat, or peel under extreme UV. Save them for interiors or deep shade.
Application steps for Phoenix Heat:
- Work in shade or indirect light between 50 and 90°F. Hot boards flash-dry and block penetration.
- Stir the can well. Do not shake, which traps bubbles.
- Apply a thin, even coat with a quality brush or stain pad. Keep a wet edge on wide runs.
- Let the wood drink for 10 to 20 minutes, then back-brush to even out and wipe any shiny puddles.
- Apply a second coat as directed. Many oils want a wet-on-wet second pass, and water-based stains often need a light second coat after 2 to 4 hours.
- Respect dry times. Light foot traffic after 24 hours, heavy use after 48 to 72 hours, depending on product and weather.
Need help with your project or don’t have time to do the work yourself? Hire a professional.
How this stops cracking and fading:
- Penetration keeps fibers flexible, so checks do not open wide during daily heat swings.
- UV blockers and pigment slow lignin breakdown, so color lasts and grain stays tight.
- Water repellency cuts repeated swelling, which is what drives warping and end-grain rot.
Pro tips:
- Choose a semi-transparent tint over a clear sealer. The pigments are like sunscreen for your wood, providing significantly more UV protection and longer-lasting color.
- Treat the end grain first. It soaks up finish like a straw and is the most common entry point for water.
- Recoat when water stops beading or color lightens by one shade, not when bare wood shows.
Charred Wood Technique
For a naturally durable and striking finish, the Japanese technique of Shou Sugi Ban (charred wood) offers a unique defense against sun, moisture, and pests. It can be a smart upgrade on budget woods like pine and fir when you want durable cladding, fencing, or trim with a striking look.
How it works:
- Controlled flame chars the surface. The char seals pores and reduces water uptake.
- The carbon layer absorbs UV, which slows color fade and fiber damage.
- No synthetic film to crack or peel, which fits hot, dry climates.
Simple DIY process:
- Prep and sand as you would for stain. Clean off dust.
- Use a propane torch to burn the surface until it turns uniform black with slight cracking in the grain. Keep the torch moving to avoid deep gouges.
- Quench gently with a damp cloth or water mist, then let dry.
- Brush off loose soot with a stiff nylon brush to expose the textured ridges you like.
- Finish with a penetrating oil, such as a clear or lightly pigmented exterior oil. Apply thin, wipe off excess, and let cure.
Benefits:
- Water-repellent shell that reduces swelling from irrigation splash.
- Sun resistance without chemical films, since char itself is a UV absorber.
- Aesthetic appeal that pairs well with modern and rustic yards. The grain pops and hides dust.
Care plan:
- Re-oil charred surfaces every 1 to 2 years on full-sun faces, or when they look dry. The char layer stays; you are just feeding the wood.
Safety note:
The Shou Sugi Ban technique involves an open flame and requires proper safety precautions. While it can be a rewarding DIY project, it’s essential to work outdoors, away from flammable materials, and have a hose or fire extinguisher ready. If you’re new to this method, practice on scrap wood first to get a feel for the process. For large or critical projects, hiring an experienced professional is always the safest option.
Add Shade and Covers for Extra Shielding
Finish alone is not enough in a yard with daily sun and sprinkler arcs. Cut direct exposure and you extend finish life by years.
Smart shade ideas:
- Awnings and pergola covers over benches and dining sets reduce midday UV. Fixed fabric or rigid panels can drop temperatures on surfaces by double digits.
- Umbrellas with UV-rated fabric are a fast win for furniture and grill stations. Choose vented canopies for airflow.
- Removable fabric covers for tables and benches block sprinkler spray and dust between uses.
Key tips for Arizona yards:
- Choose breathable covers so trapped irrigation moisture can escape. Look for woven polyester with vents, not vinyl tarps that sweat.
- Size covers to hang short of the ground. This allows airflow and reduces wicking from wet patios or gravel.
- For local solutions, Phoenix shade structures companies offer tensioned sails, aluminum pergolas, and custom awnings sized to patios and pool decks. Shade the west and south exposures first for the biggest gain.
Use covers wisely:
- Let wood dry before covering after irrigation or storms.
- In monsoon season, uncover after rain to speed drying and prevent mildew.
- Sweep dust often. Grit acts like sandpaper in the wind and wears finishes fast.
Combine these moves, a penetrating UV finish, strategic shade, and good dry times, and you will keep color longer, stop checks before they grow, and avoid the peel-and-rebuild cycle that Arizona yards are known for.
Local Tips for Phoenix Backyards
Sun, heat, and irrigation hit a little differently across the Valley. Small tweaks by neighborhood can help your finish last longer.
- Phoenix and Tempe: Full-sun patios and block walls reflect heat onto decks and fences. Use semi-transparent tints with strong UV blockers, and add afternoon shade on west-facing spots. In Tempe’s older neighborhoods, check irrigation overspray along shared fence lines.
- Gilbert and Chandler: Many yards use automatic sprinklers and drip around planters. Tune heads to avoid fence bottoms and bench legs, and raise wood off gravel with small spacers for airflow. Hard water is common, so keep vinegar on hand for mineral spots and brighten wood each spring.
- Scottsdale and Paradise Valley: Elevated exposure and stucco glare can cook finishes fast. Go with high-quality penetrating oils or pro-grade water-based stains with heavy UV packages. Consider pergola panels or tensioned shade sails for west sides to double finish life.
- Mesa and Queen Creek: Wind can drive dust into finishes. Rinse monthly in summer and recoat high-wear rails yearly. If you’re near irrigated greenbelts, seal end grain aggressively and watch for splash back after watering days.
- Peoria and Glendale: Pool decks and misting systems keep surfaces damp. Choose penetrating oils that handle frequent wet to dry cycles, and use breathable furniture covers so moisture can escape.
- Goodyear, Surprise, and Buckeye: Newer subdivisions often have young trees with limited shade. Start with a pigmented stain from day one, then plan a fall refresh each year until the landscape matures.
Quick local wins:
- Shade the west and south exposures first.
- Aim sprinkler heads away from wood; switch to drip near fences.
- Treat end grain every time you recoat.
- Reapply in fall when temps drop and boards accept finish better.
Maintain Your Wood Features for Years of Enjoyment
Arizona’s sun, dust, and irrigation are relentless. A simple routine keeps wood looking sharp, stops small issues from growing, and saves money over time. Think in short, regular bursts of care. Clean light but often, inspect with purpose, and refresh the finish before it fails.
Simple Cleaning and Inspection Routines
A gentle clean and a quick check catches early damage and keeps finishes working. Most jobs take minutes if you stick to a simple schedule.
Try this easy cadence:
- Monthly in summer: Rinse off dust, pollen, and overspray. Dust acts like sandpaper in the wind.
- Quarterly year-round: Wash, inspect, and touch up. Add five extra minutes after monsoon storms.
- Annually: Deep clean and tighten fasteners.
How to clean without harming the finish:
- Rinse with a garden hose to float off grit. Avoid high pressure. If you use a power washer, keep it under 800 PSI and stand back.
- Wash with a bucket of mild soap and water. Use a soft nylon brush or a natural bristle brush. Scrub with the grain.
- Spot clean irrigation mineral stains. Mist the area with a 1:1 white vinegar and water mix, wait 3 to 5 minutes, then brush and rinse. For tough spots, use an oxalic acid wood brightener as directed.
- Dry fully. Morning shade or late afternoon is best so the surface does not flash dry and raise the grain.
Tools that work and do not scratch:
- Soft brush, microfiber cloths, bucket, mild soap.
- Garden hose with a shower setting.
- Plastic scraper for sap or bird droppings.
- Oxalic acid brightener for rust and tannin marks.
- Leaf blower to clear dust and leaves between washes.
What to inspect each quarter:
- Finish health: Look for dull, chalky spots or patchy color.
- Water behavior: Splash a little water. If it no longer beads, plan a recoat.
- Joints and fasteners: Tighten loose screws. Replace rusted hardware that stains wood.
- End grain and bases: Press with a screwdriver. Soft spots signal moisture issues.
- Irrigation reach: Watch a watering cycle. Adjust heads to stop overspray on rails and fence lines.
Quick touch-ups that pay off:
- Sand snags with 150 grit, then dab on finish to seal the spot.
- Brush a fresh finish on sun-burned top rails before they gray.
- Clear soil and mulch back from posts so bases can breathe.
Small habits prevent big repairs. Keeping minerals, dust, and standing water off the surface lets your finish last the full season.
When to Reapply Finishes and How
Recoat before failure, not after. You will use less product, finish faster, and keep the color even.
Clear signs it is time:
- Color fading by a shade or two on sun-facing boards.
- Water stops beading within seconds and starts soaking in.
- Dry, rough feel that snags a cloth.
- Tiny checks that widen after hot days.
Simple timing for Arizona:
- Full sun and heavy irrigation: every 12 months.
- Partial sun or limited overspray: every 18 to 24 months.
- Deep shade with low wear: every 24 months, spot check at 18.
Best season to recoat:
- Fall is ideal in Arizona. Cooler temps help penetration, and you avoid peak summer heat. Early spring works too, just avoid windy days.
Step-by-step refresh:
- Clean as outlined above. Rinse well and let the wood dry 24 to 48 hours.
- Sand lightly with 120 to 150 grit on worn areas to knock down raised grain and open pores. Wipe dust with a damp cloth or tack cloth.
- Treat the end grain first. This area absorbs both finish and water readily, so giving it an extra coat is critical for preventing rot.
- Apply a penetrating, UV-blocking oil or water-based stain. Use a high-quality brush or pad. Work in shade, between 50 and 90°F.
- Keep coats thin. Let the wood drink for 10 to 20 minutes, then back-brush to even out and wipe shiny spots.
- Apply the second coat as the label directs. Many oils prefer wet-on-wet. Water-based products often need a short wait.
- Respect cure times. Light use after 24 hours, heavy use after 48 to 72 hours.
A quick exposure guide for busy homeowners:
| Exposure level | Typical recoat frequency | Quick tip |
|---|---|---|
| Full sun + overspray | 12 months | Use a semi-transparent tint for stronger UV protection |
| Partial sun | 18–24 months | Recoat top rails yearly, broader surfaces biannually |
| Shade, low irrigation | 24 months | Spot test water beading each quarter |
Seasonal tips that stretch finish life:
- Before winter: Clean, check beading, and recoat in the fall if due. Lift planters and clear debris from post bases. Add breathable covers for benches and tables.
- Spring: Realign sprinkler heads, flush lines, and shorten run times near wood. Re-seal any end-grain cuts from winter projects.
- Summer: Rinse dust monthly. Use umbrellas or covers on the hottest weeks to cut UV.
- Monsoon: Uncover after storms to dry surfaces. Brush off grit so it does not grind into the finish.
Why this saves money:
- Recoating on time reduces sanding and rebuilds.
- Pigmented, penetrating finishes last longer in the sun, so you buy and apply less over the years.
- Stopping water at the end grain prevents hidden rot, the most expensive repair.
Set two reminders now, one for a quick spring check and one for a fall refresh. A few planned hours each year can add years to your deck, fence, and furniture.
Frequently Asked Questions
Arizona’s sun and irrigation put wood under constant stress. These quick answers tackle the most common questions so you can protect color, stop rot, and keep maintenance simple.
Protect Your Investment: Maintenance is Key
Protecting outdoor wood in Arizona comes down to three moves. Choose stable, durable species that handle heat and water. Prep well, then use a penetrating, UV-blocking finish that resists irrigation. Maintain on a simple schedule so the surface never falls behind.
Start small to build momentum. Pick one feature that needs help, such as a sun-burned top rail or the fence line near sprinklers. Clean it, touch up end grain, and apply a thin, tinted oil or pro-grade water-based stain. Work in shade, wipe excess, and let it cure fully. You will see better color, tighter grain, and real water beading.
Keep the gains with light care. Rinse dust in summer, watch irrigation arcs, and recoat when water stops beading. Add shade or breathable covers where it makes the biggest difference, especially on west and south exposures.
Take the next step this weekend. Tackle one section, tune your sprinklers, and lay a fresh coat. Repeat that rhythm each season, and your deck, fence, and furniture will stay strong, look sharp, and stay ready for Arizona evenings without worry.